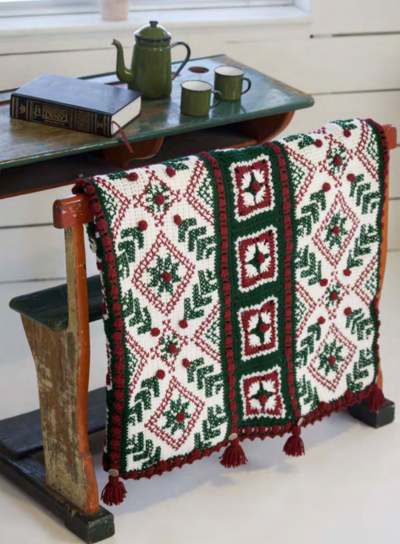
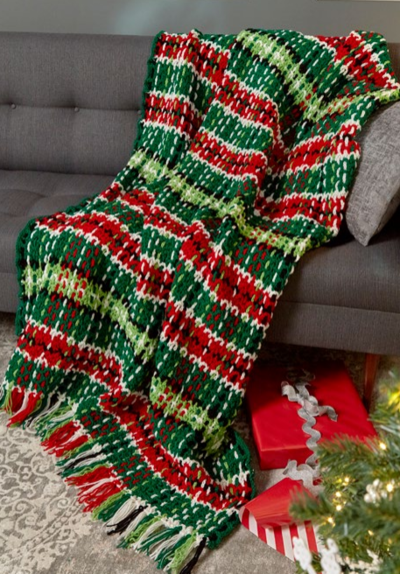
Festive Step Ladder Throw
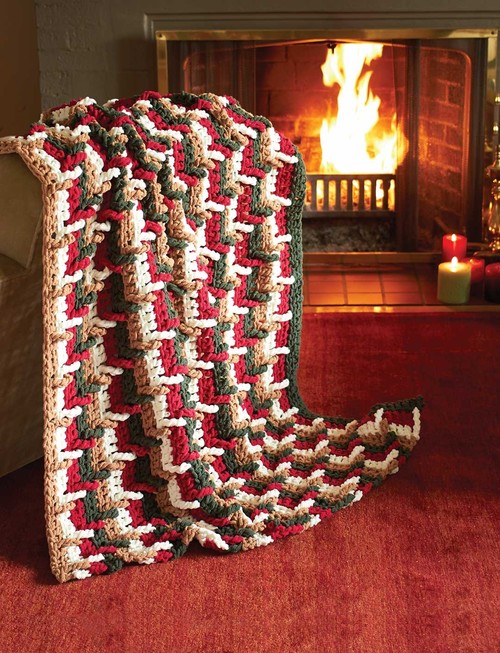
Get ready for the holidays with the Festive Step Ladder Throw! If you're looking for a totally unique throw to snuggle up with this holiday season, then this pattern is definitely for you. Using a classic holiday color scheme of green, red, white, and gold, this crochet afghan creates the unique step ladder design. With each step a different color, it turns into a colorful crochet afghan full of modern flair. This is one crochet afghan pattern you don't want to miss!

Crochet HookM/13 or 9 mm hook
Yarn Weight(6) Super Bulky/Super Chunky (4-11 stitches for 4 inches)
Materials:
- Bernat® Blanket™ (5.3 oz/150 g; 108 yds/98 m): Contrast A Pine Bough (86242) 2 balls, Contrast B Cranberry (86705) 2 balls, Contrast C Sugar Cookie (86009) 2 balls, Contrast D Caramel (86012) 2 balls.
- Size U.S. M/13 (9 mm) crochet hook or size needed to obtain gauge.
Measurements: Approx 43" x 55" [109 x 139.5 cm].
Gauge: 6 dc and 3 rows = 4" [10 cm].
Instructions
Notes:
- Afghan is worked sideways.
- Always beg each row with RS facing.
- Do not turn at end of row.
- Ch 3 at beg of row counts as dc throughout.
Stripe Pat
With A, work 1 row.
With B, work 1 row.
With C, work 1 row.
With D, work 1 row.
These 4 rows form Stripe Pat.
With A, ch 87.
1st row: (RS). 1 dc in 4th ch from hook. 1 dc in each ch to end of chain. Fasten off. 85 dc.
2nd row: (RS). Join B to top of first ch 3. Ch 3. Working in back loops, 1 dc in each dc to end of row. Fasten off.
3rd row: (RS). Join C to top of ch 3. Ch 3. Working in back loops, 1 dc in each of next 3 dc. 1 dtr in rem front loop of next st 2 rows below. *1 dc in each of next 4 dc. 1 dtr in rem front loop of next st 2 rows below. Rep from * to end of row. Fasten off.
4th row: (RS). Join D to top of ch 3. Ch 1 (does not count as st). 1 dtr in rem front loop of first st 2 rows below. Working in back loops, 1 dc in each of next 4 sts. *1 dtr in rem front loop of next st 2 rows below. 1 dc in each of next 4 sts. Rep from * to end of row. Fasten off.
5th row: (RS). Join A to first dtr. Ch 3. *1 dtr in rem front loop of next st 2 rows below. Working in back loops, 1 dc in each of next 4 sts. Rep from * to last 4 sts. 1 dtr in rem front loop of next st 2 rows below. 1 dc in each of last 3 dc. Fasten off.
6th row: (RS). Join B to top of first ch 3. Ch 3. Working in back loops, 1 dc in next dtr. *1 dtr in rem front loop of next st 2 rows below. 1 dc in each of next 4 sts. Rep from * to last 3 sts. 1 dtr in rem front loop of next st 2 rows below. 1 dc in each of last 2 dc. Fasten off.
7th row: (RS). Join C to top of first ch 3. Ch 3. Working in back loops, 1 dc in each of next 2 sts. *1 dtr in rem front loop of next st 2 rows below. 1 dc in each of next 4 sts. Rep from * to last 2 sts. 1 dtr in rem front loop of next st 2 rows below. 1 dc in last dc. Fasten off. First 7 rows of Stripe Pat are complete.
Keeping cont of Stripe Pat, rep 3rd to 7th rows for Step Ladder Pat until work from beg measures 43" [109 cm]. Fasten off.
Your Recently Viewed Projects

Thanks for your comment. Don't forget to share!
Zeemer
Oct 24, 2018
Yes, the stitches came out looking like ladders. Very cleverly designed to achieve that ladder look. Nice!
Cheryl Y
Oct 20, 2018
Wow what a beautiful pattern this Festive Step Ladder Throw is. I have to research how to do the dtr stitch. I don't believe I have ever done it before. I'm hoping it isn't to hard of a stitch to do. I really like the colors used and hope to find a yarn to make this one. Thank you so much for sharing this free crochet throw pattern.
kathleenia
Nov 05, 2017
I am unable to find the yarn recommended in this pattern in these colors either online or in stores.
Editor Kaitlin
Nov 06, 2017
Hi kathleenia 7912048, It's possible the yarn is no longer available in these colorways. However, this pattern would work up well in any color, or in a different super bulky yarn in similar colors to those above. I hope that helps! --Kaitlin, AFCAP Editor
Nthatcher 2798984
Sep 15, 2016
I really wish that all sites with free patterns would include the print/pdf button. I woul rather save the pattern on my iPad than waste paper printing it. I always seem to loose the printed one.
pinkcaddy7
Jul 31, 2015
I don't get what it means that at the end of Row 1 your don't turn your work. HOW can you always have the RS facing you? Confused.
lisafaryadi 162069 3
Aug 03, 2015
I'm thinking that because every row is fastened off, you just join the next color with the right side facing you.
ntagati 0574927
Oct 19, 2015
Great little tutorial here. -) https//www.youtube.com/watch?v=m-zHl9LKwlY
Report Inappropriate Comment
Are you sure you would like to report this comment? It will be flagged for our moderators to take action.
Thank you for taking the time to improve the content on our site.