Dhurrie Inspired Crochet Throw
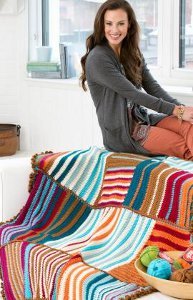
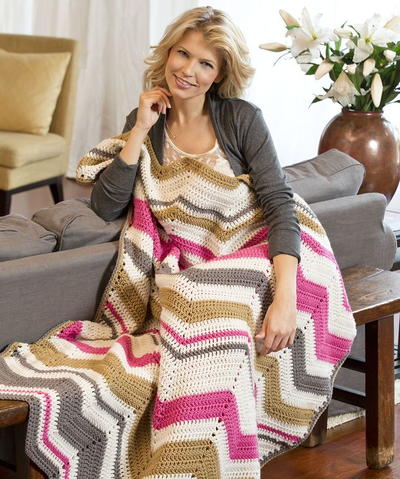
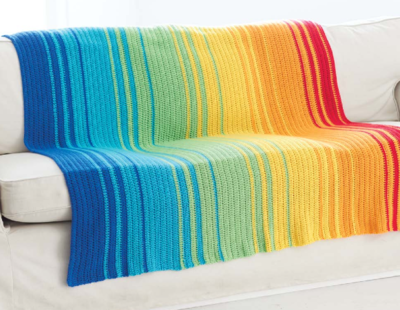
If you're searching for a bright and beautiful crochet afghan pattern, then look no further than the Dhurrie Inspired Crochet Throw from Red Heart Yarns. This stunning throw pattern takes after the traditional India floor covers. With sections of various brightly colored stripes, this throw is a must for anyone looking to add a bright pop of color to their home. Plus, it'll easily work with either a traditional or modern home decor. Add a splash of color with the help of this beautiful crochet pattern.

Crochet HookJ/10 or 6 mm hook
Yarn Weight(4) Medium Weight/Worsted Weight and Aran (16-20 stitches to 4 inches)
Materials:
- RED HEART® Soft®: 2 balls each 4601 Off White A, 1882 Toast B, 1 ball each 9779 Berry C, 9520 Seafoam D, 4422 Tangerine E, 9518 Teal F, 2515 Turquoise G, and 4608 Wine H.
- Susan Bates® Crochet Hook: 6mm [US J-10]
- Stitch holder or large safety pin, yarn needle.
Size: Throw measures 50” (127 cm) wide x 52” (132 cm) long.
Gauge/Tension:
Gauge: 12 sts = 4” (10 cm); 7 rows = 4” (10 cm) in double crochet. CHECK YOUR GAUGE. Use any size hook to obtain the gauge.
NOTES
1.Throw is made from 3 rectangles:Rectangle 1, Rectangle 2, and Rectangle 3.
2. Rectangle 1 is worked in one piece, changing color to form stripes. Rectangle 2 is worked in two sections causing the stripes to go in different directions. Rectangle 3 is worked in four sections. Refer to assembly diagram for arrangement of rectangles and sections.
3. To change color, work last stitch of old color to last yarn over. Yarn over with new color and draw through all loops on hook to complete stitch. Whenever possible, do not cut old yarn. Carry colors not in use carefully up side edge until next needed. Cut the yarn if you need it again at the opposite side of the piece, and whenever you will no longer need the color.
RECTANGLE 1
With C, ch 37.
Row 1:
Dc in 3rd ch from hook (beginning ch counts as first dc), dc in each remaining ch across, turn—36 dc (including the beginning ch).
Rows 2–7:
Ch 2 (counts as first dc here and
throughout), dc in each st across, turn; change to D in last st of Row 7.
Rows 8–77:
Repeat Row 2 and change color as in following color sequence: Work [1 row with D, 1 row with E, 1 row with B] 4 times,1 row with D, 3 rows with C, 3 rows with G, 1 row with H, [1 row with A, 2 rows with B, 1 row with A, 1 row with H] 4 times, 3 rows with G, 3 rows with H, [2 rows with E, 2 rows with A] 3 times, 2 rows with E, [2 rows with D, 2 rows with F] twice, 2 rows with D; change to A in last st of Row 77.
Row 78:
With A, ch 1, hdc in each st across; change to F in last st, turn.
Rows 79–84:
Repeat Row 78 and change color as in following color sequence: Work 1 row with F, 1 row with D, 1 row with A, 1 row with F, 1 row with D, 1 row with A; change to C in last st of Row 84.
Row 85:
With C, ch 1, hdc in each st across; change to D in last st, turn.
Rows 86 and 87:
With D, ch 2, dc in each st across, turn; change to C in last st of Row 87.
Rows 88–90:
Repeat Rows 85–87; do not change color at the end of Row 90.
Fasten off.
RECTANGLE 2
Section 1
With E, ch 34.
Row 1:
Dc in 3rd ch from hook (beginning ch counts as first dc), dc in each remaining ch across, do NOT turn, ch 2—33 dc. Remove loop from hook and place on stitch holder or large safety pin.
Row 2: Draw up a loop of B in top of beginning ch of row just completed, ch 2, dc in each st across to last st, yarn over, insert hook in top of last dc and draw up a loop, yarn over and draw through 2 loops on hook, drop B, return loop of E to hook and draw through remaining 2 loops on hook to complete last dc, turn.
Row 3:
With E, ch 2 (counts as first dc here and throughout), dc in each st across, do NOT turn, ch 2. Remove loop from hook and place on stitch holder or large safety pin.
Rows 4–23:
Repeat Rows 2 and 3 ten times, turn at the end of Row 23.
Row 24:
With E, ch 2, dc in each st across; change to H in last st, turn.
Rows 25 and 26:
With H, ch 2, dc in each st across, turn; change to E in last st of Row 26.
Rows 27–35:
Repeat Row 25 and change color as in following color sequence: Work [2 rows with E, 2 rows with H] twice, 1 row with E.
Fasten off.
Section 2
Set-Up Row: Hold Section 1 sideways so that the H-colored stripes are to your right to work in ends of rows across long/side edge. Draw up a loop of E in corner at beginning of long edge, ch 1, work 70 sc evenly spaced across top edge, turn. Fasten off E.
Row 1:
Working across set-up row of Section 1, draw up a loop of A in first st, ch 2, working in spaces between sts (instead of in top of sts), work 60 hdc evenly spaced across, turn—60 hdc.
Row 2:
With A, ch 2, dc in each st across; change to G in last st, turn.
Row 3:
With G, ch 1, hdc in each st across, turn.
Row 4:
With G, ch 2, dc in each st across; change to A in last st.
Rows 5–22:
Repeat Rows 3 and 4 and change color as in following color sequence: Work [2 rows with A, 2 rows with D, 2 rows with A, 2 rows with G] twice, 2 rows with A; change to E in last st of Row 22.
Rows 23–36:
Repeat Row 4 only and change color as in following color sequence: Work [2 rows with E, 2 rows with A] twice, 1 row with B, 2 rows with A, 1 row with H, 2 rows with A; change to G in last st of Row 36.
Rows 37–44:
Repeat Rows 3 and 4 and change color as in following color sequence: Work 2 rows with G, 2 rows with A, 2 rows with D, 2 rows with A; change to F in last st of Row 44.
Rows 45–47:
With F, ch 2, dc in each st across.
Row 48:
With F, ch 2, dc in next 16 sts; change to B, dc in last 43 sts, turn.
Row 49:
With B, ch 2, dc in next 42 sts; change to F and fasten off B, dc in last 17 sts; change to B in last st, turn. Fasten off F.
Row 50:
With B, ch 2, dc in next 16 sts; change to F, dc in last 43 sts, turn.
Row 51:
With F, ch 2, dc in next 42 sts; change to B and fasten off F, dc in last 17 sts; change to F in last st, turn. Fasten off B.
Rows 52–55:
Repeat Rows 48–51; change to H in last st of Row 55.
Row 56:
With H, ch 2, dc in next 16 sts; change to B, dc in last 43 sts, turn.
Row 57:
With B, ch 2, dc in next 42 sts; change to H and fasten off B, dc in last 17 sts; change to B in last st, turn. Fasten off H.
Row 58:
With B, ch 2, dc in next 16 sts; change to H, dc in last 43 sts, turn.
Row 59:
With H, ch 2, dc in next 42 sts; change to B and fasten off H, dc in last 17 sts; change to F in last st, turn. Fasten off B.
Rows 60 and 61:
With F, ch 2, dc in each st across, turn; change to H in last st of Row 61.
Row 62:
With H, ch 2, dc in each st across; change to G in last st, turn.
Row 63:
With G, ch 2, dc in each st across; change to D in last st, turn.
Row 64:
With D, ch 1, hdc in each st across; change to F in last st, turn.
Rows 65–70:
Repeat Rows 62–64 twice; change to H in last st of Row 70.
Rows 71–73:
With H, ch 2, dc in each st across, turn.
Fasten off.
RECTANGLE 3
Section 1
With C, ch 34.
Row 1:
Dc in 3rd ch from hook (beginning ch counts as first dc), dc in each remaining ch across; change to A in last st, turn—33 dc.
Row 2:
With A, ch 2 (counts as first dc here and throughout), dc in each st across; change to E in last st, turn.
Row 3:
With E, ch 2, dc in each st across; change to C in last st, turn.
Row 4:
With C, ch 2, dc in each st across; change to A in last st, turn.
Rows 5–13:
Repeat Rows 2–4 three times; change to D in last st of Row 13.
Rows 14–35:
Repeat Row 2 and change color as in following color sequence: [1 row with D, 4 rows with B] 3 times, 1 row with D, 2 rows with F, 2 rows with D, 2 rows with F.
Fasten off.
Section 2
Set-Up Row: Hold Section 1 sideways so that the C - colored stripes are to your left to work in ends of rows across long/side edge. Draw up a loop of B in corner at beginning of long edge, ch 1, work 70 sc evenly spaced across top edge, turn.
Row 1:
Working across set-up row of Section 1, draw up a loop of B in first st, ch 2, working in spaces between sts (instead of in top of sts), work 60 hdc evenly spaced across, turn—60 hdc.
Row 2:
With B, ch 2, dc in each st across; change to A in last st, turn.
Row 3:
With A, ch 1, hdc in each st across, turn.
Row 4:
With A, ch 2, dc in each st across; change to A in last st.
Rows 5–34:
Repeat Rows 3 and 4 and change color as in following color sequence: Work [2 rows with G, 2 rows with A] twice, [2 rows with D, 2 rows with A] twice, [2 rows with F, 2 rows with A] twice, 2 rows with B, 2 rows with E, 2 rows with H; change to B in last st of Row 22.
Row 35:
With B, repeat Row 4.
Fasten off.
Section 3
Set-Up Row: Hold Section 1 to work across other long/side edge. Draw up a loop of F in corner at beginning of long edge, ch 1, work 70 sc evenly spaced across top edge, turn.
Row 1:
Working across set-up row of Section 1, draw up a loop of F in first st, ch 2, working in spaces between sts (instead of in top of sts), work 60 hdc evenly spaced across, turn—60 hdc.
Row 2:
With F, ch 2, dc in next 34 sts, turn; leave remaining 25 sts unworked for Section 4—35 dc.
Rows 3–5:
With F, ch 2, dc in each st across, turn; change to E in last st of Row 6.
Rows 6–39:
Repeat Row 3 and change color as in following color sequence: Work 1 row with E, 4 rows with F, 1 row with E, [4 rows with B, 1 row with A] twice, [4 rows with H, 1 row with G] twice, 4 rows with E, 1 row with F, 2 rows with E, 1 row with F.
Fasten off.
Section 4
Note: The side edges of Sections 3 and 4 can be sewn together after both sections are complete, or can be crocheted together as you go, as follows: At the beginning of odd-numbered rows, work the beginning ch-2 and then remove the loop from the hook. Insert the hook from front to back through edge of Section 3. Place the dropped loop back onto the hook and draw it through, complete the row as instructed. Work even-numbered rows as instructed to the end of the row, then remove the loop from the hook. Insert the hook from front to back through edge of Section 3. Place the dropped loop back onto the hook and draw it through.
Row 1:
Draw up a loop of A in first unworked st following Row 1 of Section 3, ch 2, dc in each st across, turn.
Row 2:
Ch 2, dc in each st across; change to G, turn.
Rows 3–38:
Repeat Row 2 and change color as in following color sequence: [2 rows with G, 2 rows with A, 2 rows with D, 2 rows with A] 3 times, 2 rows with G, [2 rows with A, 2 rows with F] twice, 2 rows with A.
Fasten off. If needed, sew side edges of Sections 3 and 4 together.
FINISHING
Weave in ends.
Assembly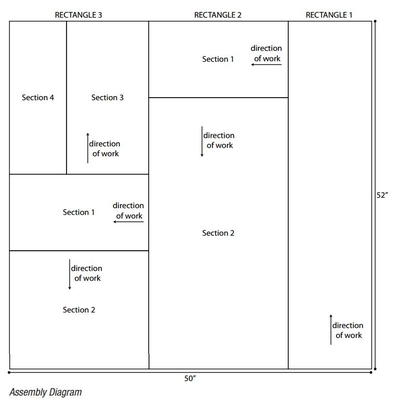
With any color, embroider blanket st evenly spaced (about one blanket st per row) across long inside edges of each rectangle. Arrange rectangles as shown in assembly diagram. Hold Rectangle 1 and Rectangle 2 with Wrong Sides together. Working from the Right Side, crochet rectangles together through blanket sts as follows: Draw up a loop of B in corner of Rectangle 1, ch 2, insert hook into first blanket st of Rectangle 1, yarn over and draw up a loop, insert hook into first blanket st of Rectangle 2, yarn over and draw up a loop, yarn over and draw through all 3 loops on hook (sc2tog made), *ch 1, insert hook into next blanket st of Rectangle 1, yarn over and draw up a loop, insert hook into next blanket st of Rectangle 2, yarn over and draw up a loop, yarn over and draw through all 3 loops on hook; repeat from * across to join the two rectangles. Maintain a relaxed tension and check to ensure that the rectangles lay flat. Repeat this process to join Rectangle 2 to Rectangle 3.
Side Edging
Row 1:
From Right Side, draw up a loop of B in corner of Throw to work across a side edge, ch 1, work (sc in edge, ch 1) evenly spaced across side edge, do NOT turn.
Row 2 (Right Side): Working in opposite direction (without turning), *(reverse) hdc in next ch-1 space, ch 1; repeat from * across.
Fasten off. Repeat across other side edge.
Top and Lower Edging
Row 1: From Right Side, draw up a loop of G in corner of Throw to work across top edge, ch 2, *skip one st (or end of a row), hdc in next st, ch 1; repeat from * working evenly across, turn.
Row 2: Ch 2, *hdc in next ch-1 space, ch 1; repeat from * across, hdc in top of beginning ch and change to B.
Row 3: *Ch 10, (sc, ch 10, sc) in next ch-1 space; repeat from * across, ch 10, sc in top of beginning ch.
Fasten off. Repeat across lower edge.
Weave in any remaining ends.
ABBREVIATIONS: A, B, C, ... = Color A, B, C,...; ch = chain; dc = double crochet; hdc = half double crochet; sc = single crochet; st(s) = stitch(es); * = repeat whatever follows the * as indicated; [] = work directions in brackets the number of times specified; () = work directions in parentheses into same stitch.
Read NextDenim and Ivory Crochet Lapghan
Your Recently Viewed Projects
Zeemer
Feb 23, 2018
Wow! I think I need months and months to do this Dhurrie Inspired Crochet Throw. It's very beautiful, I like the kaleisdoscope of colors. Very pleasant to the eyes and very refreshing!
december120964 323 0408
Feb 05, 2017
Can someone help me with this throw ? I am having a problem doing the second rectangle in section 2 on which way to go ? I have already finished section 1 in the 2nd rectangle but having problems with section 2 which way to go ? Helppp TIA
KLC
Feb 06, 2017
Hi! You may find it helpful to see the original pattern on Red Heart which has a comment section as well. Find it here: http://www.redheart.com/free-patterns/dhurrie-inspiration-throw Thanks, Krista, Editor
Trinasue
Jul 29, 2016
There is no assembly diagram. I would like to make this so I would like to see the diagram. Thanks
AFC Editor Julia
Aug 01, 2016
Hi Trinasue, We've just updated this pattern to include the assembly diagram - our mistake, its omission was an oversight. Enjoy the pattern! Julia, editor for AllFreeCrochetAfghanPatterns
Report Inappropriate Comment
Are you sure you would like to report this comment? It will be flagged for our moderators to take action.
Thank you for taking the time to improve the content on our site.

