Crochet Star Throw
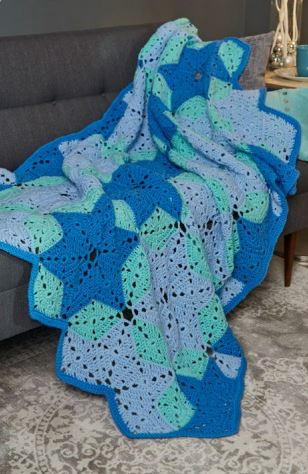
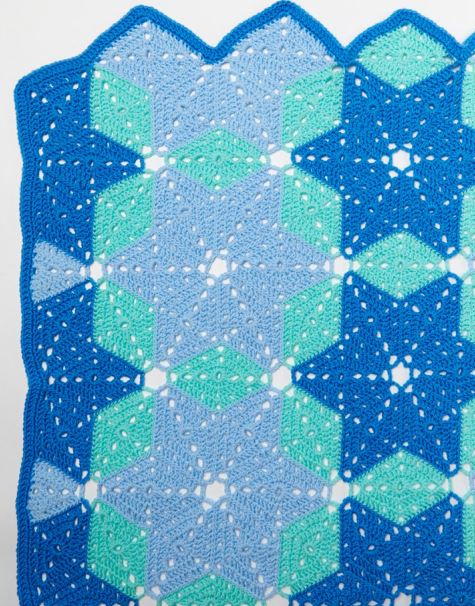
Hibernate in style this winter when you make the Crochet Star Throw! Featuring a beautiful design with blue and green yarn, this intermediate crochet throw pattern will brighten even the dreariest of days. Say goodbye to toting big, bulky crochet projects everywhere you go. In this design, you'll create a number of motifs and half-motifs that will all be sewn together. This means you can easily bring just a part of the project with you! If you're looking for a challenge, then this delightful crochet pattern is just what you need. You'll love getting toasty and warm under this throw.

Crochet HookI/9 or 5.5 mm hook
Yarn Weight(4) Medium Weight/Worsted Weight and Aran (16-20 stitches to 4 inches)
Crochet GaugeDiamond Motif = 4¼" [11 cm] at widest point x 6¾" [14 cm] at longest point. CHECK YOUR GAUGE. Use any size hook to obtain the gauge.
Finished SizeThrow measures 45" [114 cm] x 72" 183 cm]
Materials List
- RED HEART® Super Saver®: 3 skeins each 381 Light Blue A and 885 Delft Blue B; 2 skeins 520 Minty C
- Susan Bates® Crochet Hook: 5.5mm [US I-9]
- Yarn needle
Instructions
Note
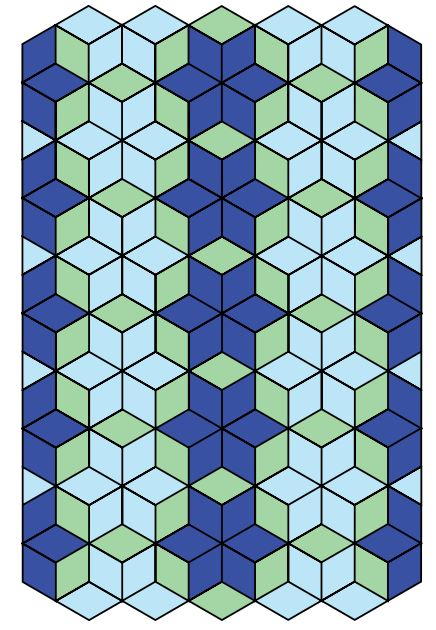
Throw is made up of 180 Diamond Motifs and 8 Half Motifs sewn together following an Assembly Diagram. Diamond Motifs are worked in the round with right side facing throughout. Half Motifs are worked in rows.
Diamond Motif
Make 180 Motifs Total: 64 in A; 60 in B; 56 in C.
-
Ch 4, join with slip st to form a ring.
-
Round 1: Ch 1, [sc, hdc, dc, tr, ch 3, tr, dc, hdc] twice all in ring; slip st in first sc to join.
-
Round 2: Ch 5 (counts as dc and ch2), dc in same sc, *dc in next 3 sts, (3 dc, ch 4, 3 dc) all in ch-3 space, dc in next 3 sts **, (dc, ch 2, dc) all in next sc; repeat from * to **; slip st in 3rd ch of beginning ch-5
-
Round 3: Ch 3 (counts as dc here and throughout), *(dc, ch 3, dc) all in ch-2 space, dc in next 2 dc, ch 1, skip next dc, dc in next 3 dc, ch 1, skip next dc, (3 dc, ch 5, 3 dc) all in ch-4 space, ch 1, skip next dc, dc in next 3 dc, ch 1, skip next dc **, dc in next 2 dc; repeat from * to **; dc in last dc; slip st in top of beginning ch-3. Fasten off
Half Motif
Make 8 in A.
-
Ch 4, join with a slip st to form a ring. Row 1 (Right Side): Ch 1, (sc, hdc, dc, tr, ch 3, tr, dc, hdc, sc) all in ring; do not join.
-
Row 2: Ch 3, turn, dc in first 4 sts, (3 dc, ch 4, 3 dc) all in ch-3 space, dc in next 3 sts, 2 dc in last sc.
-
Row 3: Ch 3, turn, dc in next 3 dc, ch 1, skip next dc, dc in next 3 dc, ch 1, skip next dc (3 dc, ch 5, 3 dc) all in ch-4 space, ch 1, skip next dc, dc in next 3 dc, ch 1, skip next dc, dc in next 2 dc, dc in top of turning ch-3 of Row 2. Fasten off.
Finishing
Following Assembly Diagram, beginning at upper right corner, sew motifs together.
-
Click here to see the larger version of the assembly diagram.
Edging
-
Round 1: With right side facing, join B in any st with a slip st, ch 1, work sc evenly spaced around, increasing sts at outer points and decreasing sts at inner points to keep work flat; slip st in first sc.
-
Round 2: Ch 3, work dc in each st around, increasing and decreasing at points as before to keep work flat; slip st in top of beginning ch-3. Fasten off. Weave in ends.
-
Click here to see the larger version of the photo below.
Abbreviations
A, B, C = Color A, B, C
ch = chain
cm = centimeters
dc = double crochet
hdc = half double crochet
mm = millimeters
sc = single crochet
st(s) = stitch(es)
tr = triple or treble crochet
( ) = work directions in parenthesis the number of times specified
* or ** = repeat whatever follows the * or ** as indicated
Read NextNo Beginning Chain Big Shell Afghan
Your Recently Viewed Projects
Morehouse17
Feb 28, 2018
To the untrained eye, you cannot see the "pieces" to this design. I know for a long time, that use to be my problem. I notice that the joining technique is sewing so for me that will add a little more time. I am not as handy with a sewing needle as I am with a hook. Right now, I am thinking about making this smaller as a baby blanket.
Delphine Bryant
Feb 28, 2018
Impressive. I think that this is a beautiful piece and I am very partial to blue. The directions read easily enough but I have a feeling the joining of the motifs is where my problem will occur. Red Heart does it again with another beautiful free pattern.
Report Inappropriate Comment
Are you sure you would like to report this comment? It will be flagged for our moderators to take action.
Thank you for taking the time to improve the content on our site.

