Brocade Crochet Blanket Pattern
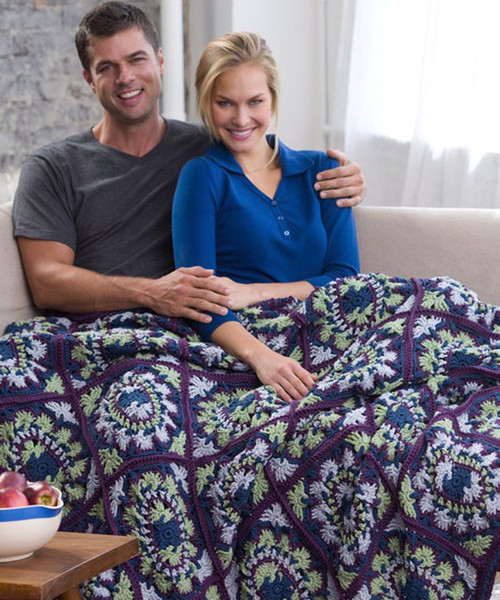
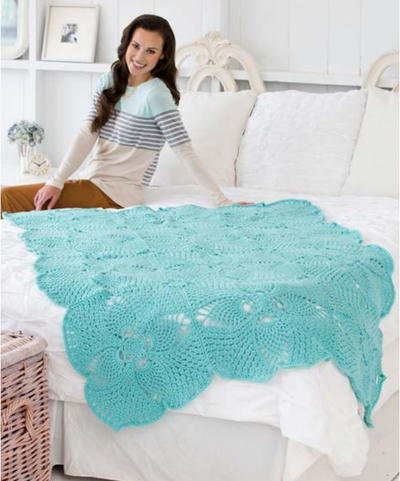
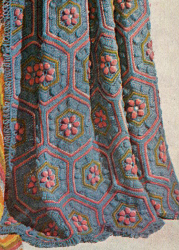
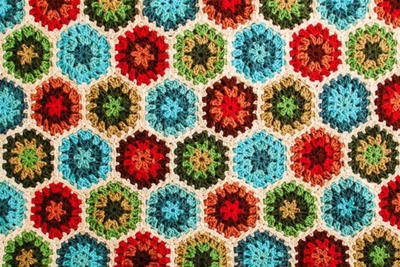
If you're searching for a crochet afghan pattern full of color, texture, and vintage charm, then look no further than the Brocade Crochet Blanket Pattern. This advanced crochet pattern uses a variety of stitches to create a beautiful flower motif. Once you've pieced together your throw, you'll have an intricately crochet throw worthy of an English palace. While this might be a challenging crochet afghan pattern, you'll have no regrets spending the time making it once it's finished.

Crochet HookK/10.5 or 6.5 mm hook
Yarn Weight(4) Medium Weight/Worsted Weight and Aran (16-20 stitches to 4 inches)
Materials:
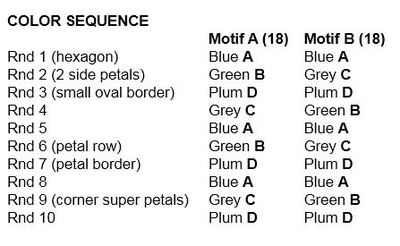
- RED HEART® “Super Saver®”: 3 skeins 0380 Windsor Blue A, 3 skeins 0661 Frosty Green B, 3 skeins 0341 Lt. Grey C, 3 skeins 0533 Dk Plum D.
- Crochet Hook: 6.5mm [US K-10.5]
- Yarn needle
Measurements: Throw measures 58” x 68.
Gauge: Motif 9” x 12”. Central hexagon = 2.5” across. CHECK YOUR GAUGE. Use any size hook to obtain gauge.
Notes:
- Beginning chain-3 counts as first double crochet.
- For petals, two chains and a slip stitch, counts as first double crochet.
- Do not join or turn rounds unless otherwise stated. Mark first stitch of each round.
- The Right Side should always face up, there is no turning.
Special Stitches:
- Modified Double Crochet (modified dc): begin dc in st indicated, but before you yarn over the second time, insert hook in ch-3 corner to the left on hexagon, yo, and pull through all 3 loops on hook.
- Single Crochet Decrease (Sc dec): (Insert hook in stitch indicated, yo, and pull up a loop) 2 times, yo, pull through all 3 loops on hook.
- Double Crochet Decrease (Dc dec): (insert hook in next st, yo, pull through st, yo, pull through 2 loops on hook) 2 times, yo, pull through all 3 loops on hook
Throw
Motif
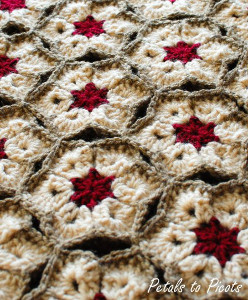
Rnd 1 - Central Hexagon
Ch 4, slip st in fourth ch from hook to form a ring.
Rnd 1: (ch 1 optional) 6 scs in ring, slip st in first sc. (6 scs)
Rnd 2: Ch 3, (counts as first dc) 2 dcs in same sc, (ch 3, 3 dcs in next sc) 5 times. Ch 3. Slip st in top of beginning ch-3. Fasten off. (18 dcs, 6 ch-3 spaces).
Rnd 2 - Two Side Petals
First petal: Ch 4, place tail of chains from front to back in any ch-3 corner on hexagon. Slip st in fourth ch from hook to form a ring. Ch 1, (optional ch 1) 6 scs in ring, slip st in first sc to join the rnd. Ch 2, slip st in the next ch-3 corner to the right on hexagon. (1st dc made.) 2 dcs in same sc on petal. Ch 3. 3 dcs in next sc, ch 3. 2 dcs in next sc, begin 1 more dc in same sc, but before you yarn over the second time, insert hook in ch-3 corner to the left on hexagon, yo, and pull through all 3 loops on hook. (modified dc). Fasten off. (9 dcs and 2 ch-3 spaces)
Second petal: Ch 4, place tail of chains from front to back in ch-3 corner on hexagon that is directly across from center of first petal. Slip st in first ch to form a ring. (ch 1, optional). 6 scs in ring, slip st in first sc to join the rnd. Ch 2, slip st in the next ch-3 corner to the right on hexagon. (1st dc made.) 2 dcs in same sc on petal. Ch 3. 3 dcs in next sc, ch 3. 2 dcs in next sc, begin 1 more dc in same sc, but before you yarn over the second time, insert hook in ch-3 corner to the left on hexagon, yo, and pull through all 3 loops on hook. Fasten off. (9 dcs and 2 ch-3 spaces)
Rnd 3 - Small Oval Border
Join with sc in right corner ch-3 space of either petal. 3 scs in same space, sc in next 3 dcs, 4 scs in ch-3 corner space, sc in next 3 dcs, 2 scs in ch-3 space of hexagon. Sc in next 3 dcs on hexagon, 2 scs in ch-3 space on hexagon. On petal, sc in next 3 dcs, 4 scs in ch-3 space. Sc in next 3 dcs, 4 scs in ch-3 space, sc in next 3 dcs. 2 scs in ch-3 space on hexagon. Sc in next 3 dcs on hexagon, 2 scs in ch-3 space on hexagon. Sc in next 3 dcs on petal. Slip st in first sc. Fasten off. (48 scs)
Rnd 4
Join with sc in 4th sc of a corner. (ch 3, skip 1 sc, sc in next sc) 23 times. Ch 3. Slip st in first sc. Fasten off. (24 ch-3 loops).
Rnd 5
Join with sc in any ch-3 loop, (ch 3, sc in next loop) 23 times. Ch 3, slip st in first sc. Fasten off. (24 ch-3 loops)
Rnd 6 - Petal Row
First petal: Ch 4. Place tail from front to back through the middle ch-3 loop of a short side. Slip st to form a ring. 6 Scs in ring. Slip st in first sc to join rnd. Ch 2, slip st in ch-3 loop immediately to the right. (1st dc made). 2 dcs in same sc on petal. Ch 2. 3 dcs in next sc on petal, ch 2. 2 dcs in next sc on petal. Begin last dc in same sc, but before you yarn over the second time, insert hook in ch-3 loop immediately to the left. Pull through all 3 loops on hook. Fasten off. (9 dcs and 2 ch-2 spaces)
Second-twelfth petals: Follow instructions for the first petal with these placements: place the second and following petals in the next unused ch-3 loop to the left. Anchor it with slip st to the right in the ch-3 loop to the right where the previous petal fastened off. Anchor each petal to the left with the modified dc in the next ch-3 loop immediately to the left.
Rnd 7 - Petal Border
Join D with sc in any ch-2 right corner of any petal. 2 scs in same space. (*Sc in next 3 dcs, 3 scs in ch-2 space, sc in next 2 dcs, in last dc and 1st dc of next petal, sc dec, sc in next 2 dcs,* 3 scs in ch-2 space.) 11 times. Repeat from * to * 1 time. Slip st in first sc. Fasten off. (168 sts)
Rnd 8
Join A with sc in the third sc of a sc-3 right corner of a petal. Sc in next 4 scs, (*ch 2, skip 2 scs, work 1st half of a dc dec in next sc, skip 3 scs, work second half of the dc dec in next sc, ch 2*. Skip 2 scs, sc in next 5 scs) 11 times. Repeat from * to * 1 time. Slip st in first sc. Fasten off. (120 sts)
Rnd 9 - Corner Super Petals
Ch 4, in a corner of the motif, place tail from front to back around both posts of blue dc dec on the previous round. Slip st to form a ring. (Ch 1, optional). 6 scs in ring. Slip st in first sc to join rnd. Ch 3, anchor with slip st to the right in the 5th sc to the right. 2 tr in same sc on petal, ch 2. 3 tr in next sc, ch 2. 2 tr in next sc. The final anchoring tr is worked as follows: yo twice, insert hook into same sc on petal, (yo and pull thru 2 loops) twice. Insert hook in 5th sc to the left, yo, pull through remaining loops. Fasten off. (9 trs and 2 ch-2 spaces) Skip two dc decs (on the blue A rnd), and place the second petal around the next dc dec. Skip two dc decs (on the blue A rnd), and place the third petal around the next dc dec. Skip two dc decs (on the blue A rnd), and place the fourth petal around the next dc dec.
Rnd 10
Join D with sc in right ch-2 corner space of any super petal. Sc in same space, *sc in next tr, 3 scs in next (middle) tr, sc in next tr, 2 scs in ch-2 space, sc in next 3 trs. Working in bls only, sc in the next 15 sts, working in both loops, sc in next 3 trs, 2 scs in ch-2 space* 4 times. Slip st in first sc. Fasten off. (120 scs).
Assembly
With Wrong sides facing each other, and D, join with sc, and sc in inside loops only of every st, matching corresponding sts on each motif. Make 6 rows of 6 motifs each alternate Motifs A and B throughout.
Edging
Rnd 1: With D, join with sc in the third sc of a sc-3 corner. Sc in each st. At joins, place one sc through both loops in the middle sc of the motifs corner and the middle sc of the next motif’s corner. In the middle sc of the four sc-3 corners, work (sc, ch 2, sc). Slip st in first sc. (44 scs and 4 ch-2 spaces)
Rnd 2: Ch 4 (counts as first tr). Place one tr in each st across to corner. At each ch-2 corner space, (tr, ch 2, tr, ch 2, tr). Repeat in pattern for all four sides and corners. Slip st in first tr. Fasten off. 756 trs and 4 corners totaling 8 ch-2 spaces)
Rnd 3: (4 super petals, one in each corner) With B or C. Ch 4, in a corner of the afghan, place tail from front to back around middle tr of tr-3 corner. Slip st to form a ring. 6 scs in ring. Slip st in first sc to join rnd. Ch 3, anchor with slip st to the right in the 4th tr to the right. 2 tr in same sc on petal, ch 2. 3 tr in next sc, ch 2. 2 tr in next sc. The final anchoring tr is worked as follows: yo twice, insert hook into same sc on petal, (yo and pull thru 2 loops) twice. Insert hook in 4th tr to the left, yo, pull through remaining loops.Fasten off. Repeat for remaining three corners.
Rnd 4: Join A with slip st in first unused tr to the left of a corner, the first one after where the super petal was anchored. Ch 4 (dc plus 1 ch) (Skip 1 st, FPdc around next tr, ch 1) Repeat from ( to ) across to corner. Skip last unused tr. * Skip 2 trs on super petal, slip st in 3rd tr, 2 scs in ch-2 space, sc in next tr, 3 scs in next tr, sc in tr, 2 scs in ch-2 space, slip st in next tr, skip 2 trs, Ch 1*. FPdc around first unused tr to the left of the corner. Repeat in pattern Repeat from * to * for each corner. Slip st in 3rd ch
of beginning ch-4. Fasten off. (360 FPdcs)
Rnd 5: Join D with sc in 3rd ch of beginning ch-4 of Rnd 4. (FPdc around the tr two rows below, sc in blue FPdc) Repeat to corner. FPdc around next tr. At corner *2 scs in slip st, 2 scs in each of next 4 sts, 3 scs in middle sc of sc-3 corner, 2 scs in each of next 5 sts.* Repeat in pattern for all four sides. Slip st in first st. Fasten off. Weave in ends. (360 FPdcs and 452 scs)
Read NextCrazy Cool Yo-Yo Crochet Afghan
Your Recently Viewed Projects
Morehouse17
Feb 28, 2018
If you are interested in owning a beautiful piece of art, this may be your project. It looks massive and really heavy. I am not sure if it because of the colors but this is a great looking piece.
Delphine Bryant
Feb 28, 2018
This brocade crochet blanket is really very pretty. The blues are very calming and the texture that is visible can also be felt under hand. I may some issues with this because of the lack of photos but nothing bets a failure but a try. I will at least attempt to make one motif.
Zeemer
Feb 23, 2018
I've always liked brocade fabric because of the texture. It is intricate, with lots of floral design in just one area. It is very rich, elaborate and very royal-looking. This Brocade Crochet Blanket pattern reminds me of that elaborate work. I wish I could do this laborious project in my lifetime. LOL.
smkslady2002 19554 08
Mar 31, 2016
Having some issues on the side petals on this mine do not look the same so not sure what I am doing wrong, please help.
IncurableRomantici st
Mar 12, 2015
Haven't made it yet, but the blanket and the instructions are the best I've ever seen. It's glorious.
Report Inappropriate Comment
Are you sure you would like to report this comment? It will be flagged for our moderators to take action.
Thank you for taking the time to improve the content on our site.

