Sunshine Pansies Afghan
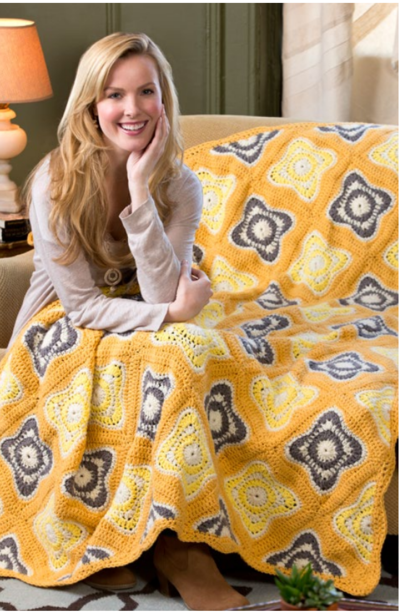
The happiest crochet blanket pattern is here! The Sunshine Pansies Afghan is simply the best afghan to wake up to in the morning. Purple and yellow pansies float across this blanket in one of the simplest crochet flower patterns ever. This crochet afghan uses the half double crochet stitch to get a beautiful texture. You'll be amazed at how easy it is to learn how to crochet these flower crochet motifs. Your morning won't be complete without this Sunshine Pansies Afghan.

Crochet HookJ/10 or 6 mm hook
Yarn Weight(4) Medium Weight/Worsted Weight and Aran (16-20 stitches to 4 inches)
Materials:
- RED HEART® With Love™: 1 skein each of 1201 Daffodil A and 1401 Pewter B; 3 (2) skeins 1303 Aran C; 4 (3) skeins 1207 Cornsilk D
- 6.0 mm [US J-10]
- Yarn needles
Size: Afghan measures 56” x 67” (142 x 107 cm) or Throw measures 45” x 56” (114.5 x 142 cm)
Gauge: First 2 rounds of Square = 3” (7.5 cm) across; Square = 7½” (19 cm) across. CHECK YOUR GAUGE. Use any size hook to obtain the gauge given.
SQUARE
Color Sequences: Make 49 (31) Squares in the following colorsequences. Square 1 (make 24 [15]): With A for Rounds 2 and 4.Square 2 (make 25 [16]): With B for Rounds 2 and 4.
With C, ch 4, join with a slip st to form a ring.
Round 1 (right side): With C, ch 3 (counts as dc here and throughout), 15 dc in ring; join with slip st in top of beginning ch-3 – 16 dc. Fasten off C.
Round 2: With right side facing, join Round 2 color with slip st in any dc, ch 3, 2 dc in same st, *hdc in next st, sc in next st, hdc in next st**,3 dc in next st; repeat from * around, ending last repeat at **; join with slip st in top of beginning ch-3 – four 3-dc corners. Fasten off.
Round 3: With right side facing, join C with slip st in center dc of any 3-dc corner, ch 3, 2 dc in same st, *hdc in next st, sc in next st, slip st in next st, sc in next st, hdc in next st**, 3 dc in next st; repeat from * around, ending last repeat at **; join with slip st in top of beginning ch-3. Fasten off C.
Round 4: With right side facing, join Round 4 color with slip st in center dc of any 3-dc corner, ch 3, 2 dc in same st, *2 dc in next st, hdc in next st, sc in next st, slip st in next st, sc in next st, hdc in next st, 2 dc in next st**,3 dc in next st; repeat from * around, ending last repeat at **; join with slip st in top of beginning ch-3. Fasten off.
Round 5: With right side facing, join C with a slip st in center dc of any 3-dc corner, ch 1, *3 sc in corner st, 2 sc in each of the next 2 sts, sc in each of next 7 sts, 2 sc in each of next 2 sts; repeat from * around; join with slip st in first sc. Fasten off C.
Round 6: With right side facing, join D with a slip st in center sc of any 3-sc corner, ch 3,2 dc in same st, *hdc in next st, sc in each of next 3 sts, hdc in next 2 sts, dc in each of next 5 sts, hdc in each of next 2 sts, sc in each of next 3 sts, hdc in next st**, 3 dc in next st; repeat from * around, ending last repeat at **; join with slip st in top of beginning ch-3.
Round 7 (wrong side): With D, ch 1, turn, sc in each of first 19 sts, 3 sc in next st, *sc in next 19 sts, 3 sc in next st; repeat from *around; join with slip st in first sc – 88 sc. Fasten off, leaving a sewing length. Weave in remaining ends.
TRIANGLE
Triangle 1 (make 12 [10]): With A for Rows 2 and 4. Triangle 2 (make 10 [8]): With B for Rows 2 and 4. With C, ch 3, join with a slip st to form a ring.
Row 1 (right side): With C, ch 3, 8 dc in ring, do not turn – 9 dc. Fasten off.
Row 2: With right side facing, join Row 2 colorwith a slip st in beginning ch-3, ch 3, dc in first st, hdc in next st, sc in next st, hdc in next st, 3 dc in next st, hdc in next st, sc in next st, hdc in next st, 2 dc in last st, do not turn – one 3 dc corner; two 2-dc corners. Fasten off.
Row 3: With right side facing, join C with a slip st in beginning ch-3, ch 3, dc in first st, hdc in next st, sc in next st, slip st in next st, scin next st, hdc in next st, 3 dc in next st, hdc in next st, sc in next st, slip st in next st, sc in next st, hdc in next st, 2 dc in last st, do not turn. Fasten off.
Row 4: With right side facing, join Row 4 color with a slip st in beginning ch-3, ch 3, dc in first st, 2 dc in next st, hdc in next st, sc in next st, slip st in next st, sc in next st, hdc in next st, 2 dc in next st, 3 dc in next st, 2 dc in next st, hdc in next st, sc in next st, slip st in next st, sc in next st, hdc in next st, 2 dc in each of last 2 sts, do not turn. Fasten off.
Row 5: With right side facing, join C with a slip st in beginning ch-3, ch 1, 2 sc in first st, 2 sc in each of next 2 sts, sc in each of next 7 sts, 2 sc in each of the next 2 sts, 3 sc in next st, 2 sc in each of the next 2 sts, sc in next 7 sts, 2 sc in each of last 3  sts, do not turn. Fasten off C.
Row 6: With right side facing, join D with a slip st in first sc, ch 3, dc in first st, hdc in next st, sc in each of next 3 sts, hdc in each of next 2 sts, dc in each of next 5 sts, hdc in each of next 2 sts, sc in each of next 3 sts, hdc in next st, 3 dc in next st, hdc in next st, sc in each of next 3 sts, hdc in each of next 2 sts, dc in each of next 5 sts, hdc in each of next 2 sts, sc in each of next 3 sts, hdc in next st, 2 dc in last st. Ch 1, turn.
Row 7 (wrong side): With D, ch 1, turn, 2 sc in first st, sc in each of next 19 sts, 3 sc in next st, sc in each of next 19 sts, 2 sc in last st. Fasten off, leaving a sewing length. Weave in remaining ends.
Assembly
Note: When joining Squares and Triangles, hold wrong sides together and sew on the right sides. Sew together into diagonal rows, following Assembly Diagram. For Afghan, start with a strip of 2 squares, then 4 squares, 6 squares, 8 squares, 9 squares, 8 squares, 6 squares, 4 squares, and 2 squares. For Throw, start with strip of 2 squares, then 4 squares, 6 squares, 7 squares, 6 squares, 4 squares, and 2 squares Sew strips together, following Assembly Diagram. Then sew Triangles around the edges, following diagram.
BORDER
Round 1: With right side facing, join D with a slip st in any corner, ch 1, *3 sc in corner st, scevenly across, working 2 sc in each row-end dc, sc in each row-end sc, sc in each center ch-3 sp and sc in each junction between 2 triangles, repeat from * around; join with a slip st in first sc.
Round 2 (wrong side): Slip st in next sc (center sc of corner), ch 3, turn, 2 dc in same st, *** *dc in each of next 2 sts, hdc in each of next 2 sts, sc in each of next 2 sts, slip st in next st, sc in each of next 2 sts, hdc in each of next 2 sts, dc in each of next 3 sts (2nd of these 3 dc is worked over center of triangle), hdc in each of next 2 sts, sc in each of next 2 sts, slip st in next st, sc in each of next 2 sts, hdc in each of next 2 sts**, dc in each of next 3 sts (2nd of these 3 dc is worked ov er junction between 2 triangles); repeat from *across to next corner, ending last repeat at**, dc in each of next 2 sts, 3 dc in corner st; repeat from *** around, ending last repeat at**, dc in each of next 2 sts; join with a slip st in top of beginning ch-3.
Round 3: Slip st in next dc (center dc of corner), ch 3, turn, 2 dc in same st, *** *dc in each of next 3 dc, hdc in each of next 2 hdc, sc in each of next 2 sc, slip st in next slip st, sc in each of next 2 sc, hdc in each of next 2 hdc; repeat from * across to next corner, dc in each of next 3 dc**, 3 dc in corner dc; repeat from *** around, ending last repeat at **; join with a slip st in top of beginning ch-3. Fasten off. Weave in ends.
If you love this pattern, check out a whole collection of 16 Honestly Beautiful Half Double Crochet Patterns!
Your Recently Viewed Projects
Zeemer
Aug 23, 2016
This Sunshine Pansies Afghan is a better version of the Crochet Pansy Afghan I've just pinned because this one has a touch of yellow which makes it more alive. And besides yellow is my favorite color which added to the 5 point rating. Thanks for this free pattern which has been made available right on this page, clearly written,easy to understand even by beginners and complete with diagrams.
Report Inappropriate Comment
Are you sure you would like to report this comment? It will be flagged for our moderators to take action.
Thank you for taking the time to improve the content on our site.

